Manage thrust, balance inertia, and battle alien gravity. Guide your lander safely onto high-multiplier target pads across 10 challenging celestial missions.
1 of 10 Missions Unlocked · 0 ★
Missions10 planets & moons
HazardsWind, asteroids, moving docks
PhysicsRealistic 2D inertia & gravity
Save Keyspace-lander:v1
About this game
Space Lander is a one-screen landing game. Your lander falls toward a planet or moon and you steer it down onto a flat pad. Hold Thrust to fire the main engine, and use the two RCS buttons to rotate left or right. Fuel is limited, so burn it carefully.
A landing counts as safe when you touch a pad slower than 1.8 m/s going down and 1.2 m/s sideways, with the lander tilted less than about 12.6 degrees. Anything harder, off a pad, or tilted too far is a crash. Pads with a bigger multiplier (2X and up) are harder to reach and score more.
There are 10 worlds, each with its own gravity, terrain and hazards such as wind, drifting asteroids, geysers and moving landing docks. Your progress and best results are saved in this browser only.
Flight Operations Manual
How to Pilot the Lander
1. Manage Your Main Engine
Tap or hold the main thruster to fight gravity and slow your descent. Watch your fuel gauge—running dry means a ballistic free-fall.
2. RCS Attitude Control
Use left and right RCS nozzles to adjust ship pitch. Ensure the lander is oriented upright before contact.
3. Safe Touchdown Telemetry
To land safely: descent speed must be under 1.8 m/s (green HUD indicator), horizontal drift under 1.2 m/s, and tilt angle level. Both footpads must land within the glowing pad beacons.
4. Score Multipliers & Hazards
Target narrower platforms for 2X, 3X, and 5X score bonuses. Beware of atmospheric wind gusts, moving landing cradles, and drifting meteor hazards.
5. Grades, Streaks & Stars
A green trajectory trail means a touchdown right now would be safe. Soft, level landings grade PERFECT (+25%) or SMOOTH (+10%). Each landing in a row adds +10% (up to +50%) until you crash or abandon a flight. Three stars need the mission's top pad, over 60% fuel and a gentle touchdown.
Controls
Keyboard: Up / W / Space thrust, Left / Right or A / D rotate, P pause, R retry, M mute, Enter continue. Touch: hold the on-screen buttons.
Mission Roster
Select Landing Site
Complete each planetary descent to unlock subsequent worlds across the solar system and deep space.
ALT0 m
V-SPD0.0 m/s
H-SPD0.0 m/s
FUEL100%
SCORE0
SITEM01
WIND0 kt
Flight paused for planning.
Approach planner
Snapshot only: braking assumes full thrust at the current tilt. Wind, hazards, pad movement and rotation can change the approach. Checks describe contact now, not a guaranteed landing.
Mission Result
TOUCHDOWN
Lander secured on target pad.
Play Space Lander Free in Your Browser
Space Lander is an authentic physics simulation inspired by classic lunar module landing games. Pilot your lander with responsive 2D Newtonian thrust, precision RCS attitude orientation, and variable gravity physics across 10 handcrafted planetary worlds.
No downloads, accounts, or in-app purchases required. Your mission progress, high scores, and star badges are preserved in this browser under space-lander:v1. Discover our other original browser games at Play in Phone including Fort Pop, Vcrush, Plates, and Pocket Pipes.
Space Lander guide · controls, landing limits, scoring, ten worlds
How to Land in Space Lander: Safe Limits, Fuel Math and Scoring for All 10 Missions
Space Lander gives you one small ship, one tank of fuel and a pad that is sometimes only 40 units wide. You hold thrust, tap two rotation buttons and try to touch down below 1.8 m/s, below 1.2 m/s sideways and within about 12 degrees of level. This guide covers the exact limits the game checks, how the fuel tank turns into points, what each of the ten worlds does differently, and the habits that stop most crashes.
Every number here is read from the game's own engine and mission files: gravity values, thrust power, fuel burn rates, pad sizes and the score formula.
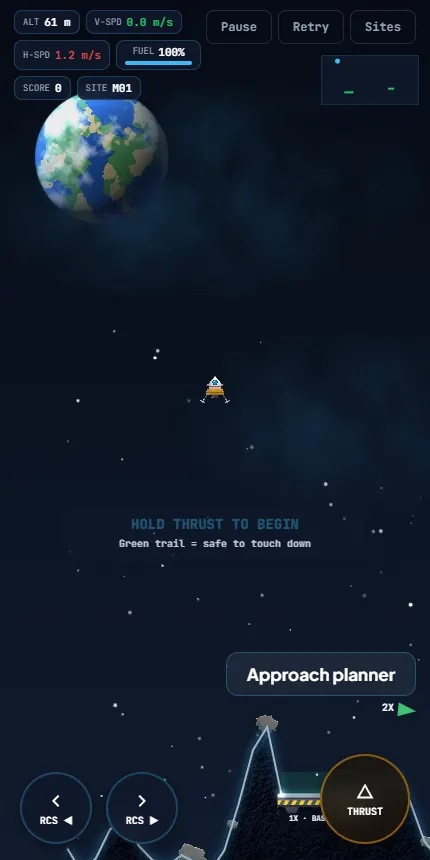
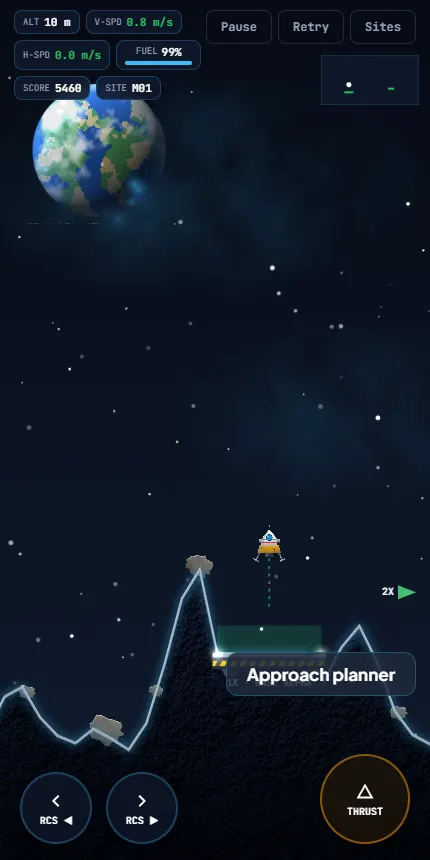
Mission 1 before you touch anything. The ship starts about 61 m up and already drifts right at roughly 1.2 m/s (the red H-SPD readout). The physics only start once you press a control.
Controls and the three landing limits
You steer with three inputs. On a keyboard, Up, W or Space fires the main engine; Left/Right or A/D fire the rotation jets (the game calls them RCS). P or Escape pauses, R retries, M mutes. On a phone you hold the on-screen THRUST, RCS left and RCS right buttons. The ship does nothing until your first input, so you can read the board before you commit.
The engine is binary: it is either on or off, with no throttle. It pushes the ship along whichever way its nose points with a force of 280 units per second squared. Gravity pulls back with the mission's gravity number times 320. On the Moon that is 51, so one engine burn beats gravity more than five to one. On Kepler-186f it is 166, and the engine only wins by about 1.7 to one.
Rotation is the part that surprises people. The jets add spin, and spin decays quickly (it loses about 8% every frame), but the angle you reach stays where it is. Nothing levels the ship for you. Holding a jet for a full second turns it roughly 35 degrees; a quick tap turns it a few. If you tilt right, you must tap left to come back.
A touchdown counts as safe only if all three checks pass at the instant a foot reaches the pad:
Descent speed 1.8 m/s or less. Internally this is 44 units per second; the HUD converts it so the number you read is the number the game tests.
Sideways speed 1.2 m/s or less. This is 29 units per second, in either direction.
Tilt 12.6 degrees or less (0.22 radians) from straight up.
Both feet must also be inside the pad edges. Hit the pad at 1.9 m/s and the ship is destroyed even though you were over the right spot; the crash report names the first failed check. Touching the terrain anywhere, or an asteroid, is an instant loss with no limits at all.
Fuel and hovering math
The main engine burns 28 fuel per second. Each rotation jet burns 4 per second, so steering is cheap and thrust is the whole budget. A full 1,000 kg tank on Mission 1 is about 36 seconds of continuous main engine. When fuel reaches zero, thrust and both jets shut off together and the ship becomes a falling rock.
The useful number is how much of the engine you need just to stay level. Because the engine is on or off, "hover" means pulsing it that fraction of the time. A world's hover share is its gravity times 320, divided by 280:
What it costs to hold still, per world
Mission
Gravity
Engine share to hover
Fuel per second of hover
Start fuel
1 Luna Tranquillity
0.16
18%
5.1
1,000
2 Crater Ridge
0.18
21%
5.8
950
3 Martian Dust Basin
0.38
43%
12.2
1,100
4 Asteroid Belt Outpost
0.08
9%
2.6
900
5 Europa Ice Chasms
0.14
16%
4.5
1,000
6 Titan Methane Sea
0.22
25%
7.0
1,150
7 Io Volcanic Spire
0.28
32%
9.0
1,050
8 Orbital Station Zenith
0.12
14%
3.8
1,000
9 Nebula Canyon Run
0.20
23%
6.4
1,200
10 Kepler-186f Deep Descent
0.52
59%
16.6
1,350
Read the last two columns together. On Kepler-186f, hovering burns the whole tank in about 81 seconds; on the asteroid outpost it would take nearly six minutes. That is why the heavy worlds punish dithering, while the light worlds punish a long careless burn: with gravity so weak, you drift upward and take ages to come back down.
Tilt also costs you. Thrust works against gravity in proportion to the cosine of your angle, so a ship leaning 12.6 degrees still delivers about 98% of its lift. Small tilts are cheap. Leaning 60 degrees to chase a pad halves your lift, and that is where tanks disappear.
How scoring and stars work
A successful landing scores this way:
Base points: 500 times the mission number (500 on Mission 1, 5,000 on Mission 10).
Add 1.5 points per unit of fuel left in the tank.
Add a soft-touch bonus: 12 points for every unit of descent speed below the limit of 44.
Multiply by the pad's multiplier (1x, 2x, 3x or 5x).
Multiply by the landing grade: PERFECT 1.25, SMOOTH 1.1, FIRM 1.
Multiply by the streak bonus: +10% for every safe landing already made in a row, capped at +50%.
PERFECT needs a touchdown under 35% of the speed limit (about 0.63 m/s) with tilt under 40% of the tilt limit (about 5 degrees). SMOOTH needs descent under 65% of the limit (about 1.17 m/s). Anything else that still lands is FIRM.
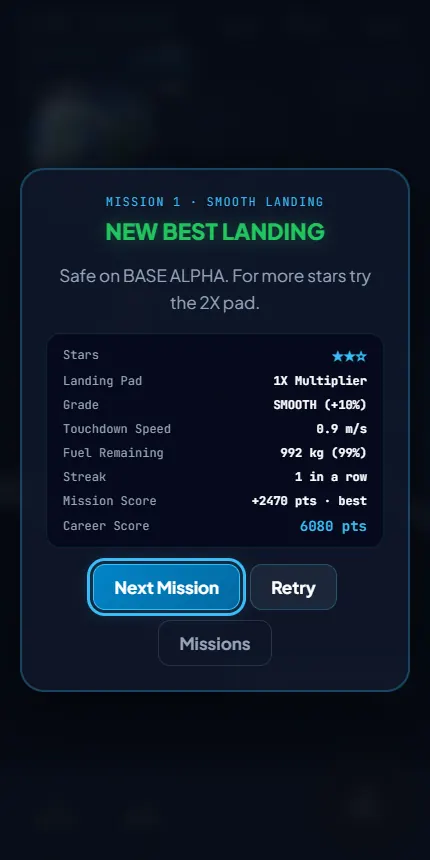
A real run from Mission 1: landing on the 1x pad with 992 of 1,000 fuel left, at 0.9 m/s down, scored 2,470. That is (500 + 1,488 for fuel + about 257 soft-touch) times 1.1 for SMOOTH. The fuel line is the biggest piece, and on a 5x pad the whole sum is multiplied by five.
The landing report lists the pad, grade, touchdown speed, fuel left and streak. The body text tells you which star requirement you missed.
Stars
Each mission can earn up to three stars. One star is any safe landing. Two stars need either more than 45% fuel left or a pad worth 2x or more. Three stars need the mission's top-multiplier pad, more than 60% fuel left and a descent under 60% of the limit (about 1.08 m/s). Every mission has such a pad, so all 30 stars are available.
Streaks and the career total
The streak counts consecutive safe landings in your current visit to the page. It resets when you crash, and also when you press Retry, R or Sites while a flight is in progress, so you cannot restart a bad approach to protect it. Your career score is the sum of your best landing on each mission, so replaying a mission only helps if you beat its best. The highest streak you reach is saved.
The ten missions
Missions unlock in order: a safe landing on mission N opens mission N+1. Progress, stars, best scores and best streak live in your browser's local storage on that device.
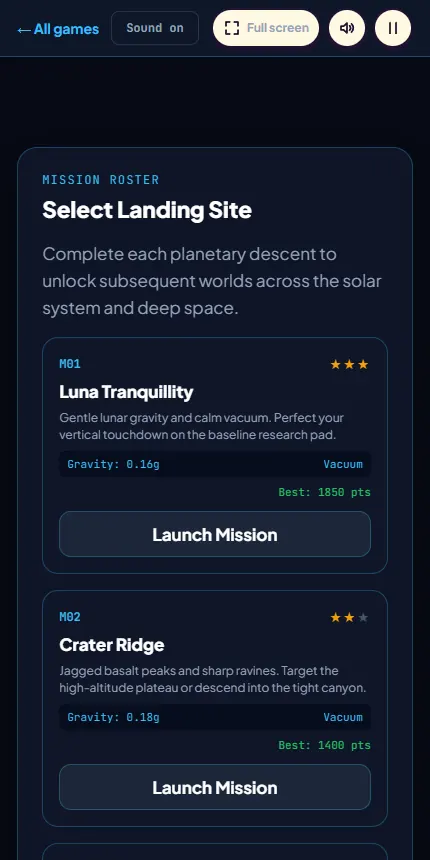
The roster shows gravity, atmosphere, stars and your best score for each unlocked world.
Pads and hazards
Mission
Pads (width, multiplier)
Hazards
1 Luna
110 wide 1x; 75 wide 2x
None
2 Crater Ridge
85 wide 2x; 55 wide 3x
Sharp peaks and ravines
3 Mars
90 wide 1x; 60 wide 3x
Gusty wind (strength 18), dust
4 Asteroid Belt
75 wide 2x; 45 wide 5x
3 drifting asteroids
5 Europa
80 wide 2x; 50 wide 3x; 40 wide 5x
Ice pillars
6 Titan
70 wide 2x on a bobbing platform; 55 wide 3x
Gusty wind (26)
7 Io
80 wide 2x; 45 wide 5x
Two geysers
8 Orbital Station
75 wide 3x on a sliding dock; 48 wide 5x
Moving dock
9 Nebula Canyon
70 wide 2x; 50 wide 5x moving drone pad
2 asteroids, gusty wind (24)
10 Kepler-186f
75 wide 2x; 42 wide 5x
3 fast asteroids, gusty wind (32)
Wind pushes the ship sideways at 1.2 times its strength in units per second squared, and the gusts swing smoothly between zero and full strength every few seconds. It always pushes to the right, so you aim to arrive left of the pad and let it carry you in. The WIND readout in the HUD shows the current strength.
Io's geysers erupt for 1.4 seconds out of every 3.5. Anything within 36 units of a geyser and up to 320 units above it gets shoved upward hard (120 times 1.8 units per second squared, against Io's own gravity of about 90). They sit at 45% and 62% of the world's width, between the two pads, so line up before you reach them and cross between bursts, or fly around.
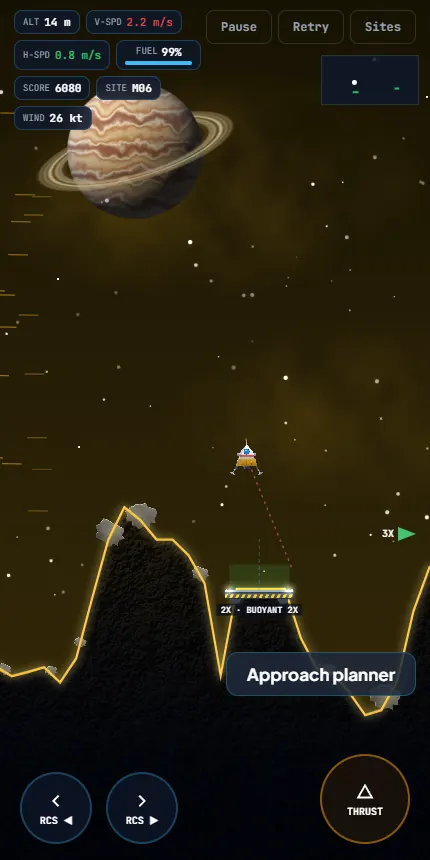
Titan: the HUD shows WIND 26 kt. The 2x pad floats and bobs by 18 units, so a landing is judged against where the pad is at touchdown.
Moving pads on Missions 6, 8 and 9 bob or slide. The dock on Mission 8 travels 120 units sideways; the drone pad on Mission 9 wanders 60 sideways and 20 up and down. Match its direction, then settle. Your sideways speed is checked against the world, not against the pad, so you still need to stay under 1.2 m/s.
Strategy, beginner to advanced
Beginner
Kill the sideways drift first. You start moving right at somewhere between 0.9 and 1.4 m/s. Do not chase altitude. Rotate a little left, burn briefly until the H-SPD readout is near zero, then straighten up.
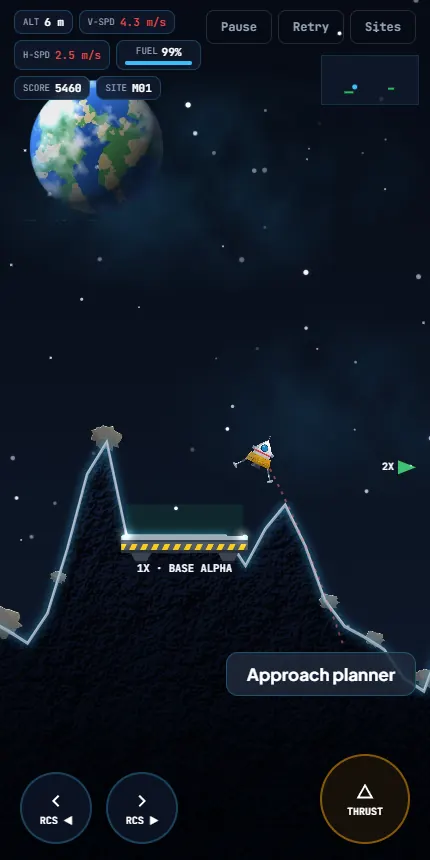
Use the green trail. The dotted path ahead of the ship turns green when touching down right now would be safe. Treat it as the check light, and watch the V-SPD and H-SPD readouts: they use the same limits as above.
Fall first, brake later. Thrust costs fuel and gravity is free. Let the ship fall through the first part of the descent, but start braking before your speed gets far past 44 units per second.
Practice on Mission 1. Its 110-wide pad forgives a lot, and its gravity is gentle enough that you can see exactly how one tap changes your speed.
Green trail and calm readouts: a touchdown now would pass all three checks.Tilted, drifting and falling at 4.3 m/s. The red readouts say this ends in a crash.
Intermediate
Brake on a straight ship. Thrust only slows a fall in proportion to how upright you are. At 45 degrees you give away about 30% of your lift, so straighten before the final burn.
Aim for the soft-touch bonus. Each unit of speed under 44 is worth 12 points, and PERFECT adds 25% on top. A last half-second of thrust costs only 14 fuel, which is 21 points, and can easily be worth more than that in soft-touch and grade bonus.
Pick the pad that matches the mission, not the biggest multiplier. A 5x pad multiplies the whole sum, but a wide 2x pad you land on every time beats a 42-wide 5x pad you hit one try in five. On Mission 10 the 5x pad is only 42 wide against heavy gravity and 32 units of wind.
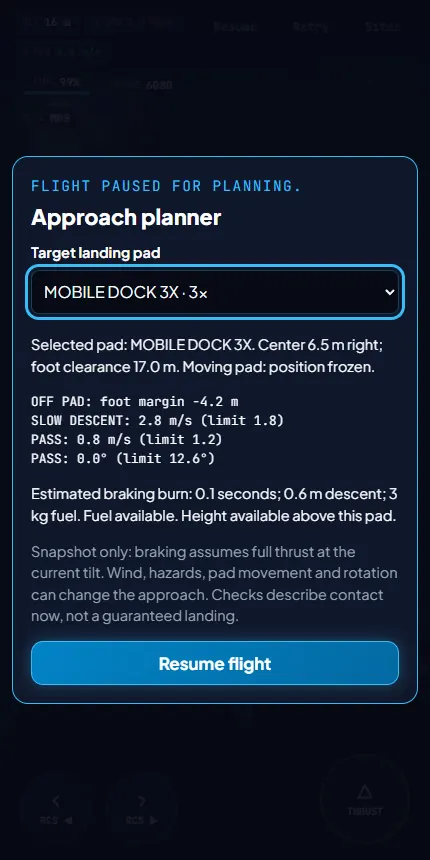
Use the approach planner. The Approach planner button pauses the flight and measures your current speed against a pad you choose: foot clearance, margin to the pad edges, and whether a full-thrust brake has enough height and fuel. It is a snapshot, so it describes your state right now and does not forecast wind or a moving pad.
The planner on Mission 8: "OFF PAD: foot margin -4.2 m" and "SLOW DESCENT: 2.8 m/s (limit 1.8)". It also estimates a 0.1 second burn and 3 kg of fuel to fix the speed.
Advanced
Treat fuel as score, not as safety margin. Every unit left is 1.5 points before any multiplier, and three-star runs need over 60%. Plan burns before the fall starts: one early correction usually costs less than three late panics.
Come in from the left on windy worlds. Wind accelerates you right, up to about 38 units per second squared on Kepler. Arrive left of the target and let the gust do the lateral work, then trim with a short burn.
Protect a long streak. The bonus climbs to +50% after five landings. Pressing Retry or R in flight wipes it, so if the streak is at +30% or more, finish the landing attempt rather than restarting.
Return for stars once the pad positions are familiar. The three-star rule asks for the top pad, over 60% fuel and a soft touch together. Plan the whole descent around those three numbers instead of landing first and checking after.
Common mistakes
Mistake
What happens
Fix
Holding thrust through the whole descent
The tank empties and thrust cuts out with ground still below
Pulse the engine in bursts and keep a fuel reserve
Leaving the ship tilted after steering
The ship does not level itself; a 15 degree lean fails the tilt check
Tap the opposite jet to return to level before the final burn
Braking too late
Even full thrust may not stop you in the remaining height
Open the planner during the fall and read the braking estimate
Ignoring sideways drift
You miss the pad edge or fail the 1.2 m/s check
Zero the H-SPD readout before you line up
Retrying mid-flight to dodge a bad run
The streak resets to zero
Finish or crash the flight if the streak matters
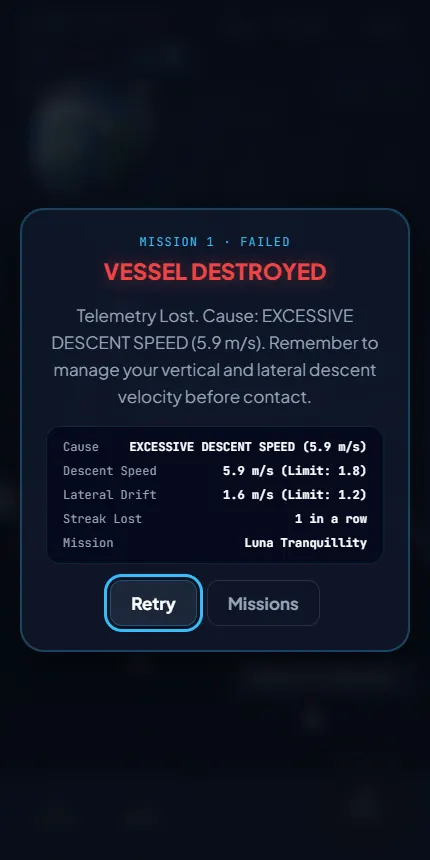
The crash report names the first failed check and lists your speeds against the limits, which tells you what to fix on the next attempt.
FAQ
What speed is too fast to land?
More than 1.8 m/s downward, 1.2 m/s sideways, or a tilt beyond 12.6 degrees. Both feet must be on the pad too.
Is there a throttle?
No. The engine is on while you hold the button. To fly slowly, pulse it.
Why did I crash with fuel left?
Fuel does not matter for the crash check. Touching rough terrain, an asteroid, or the pad outside the limits ends the run no matter how full the tank is.
How do I unlock new missions?
Land safely on the current one. Mission N opens Mission N+1. Unlocks and stars are saved in your browser.
Does retrying cost me anything?
Only the streak, and only if you retry during a flight. After a crash the streak is already gone.
Can I play with touch controls?
Yes. Hold the on-screen THRUST, RCS left and RCS right buttons. You can hold thrust and a jet together.
Pick a pad, kill the drift, and aim for under 1 m/s at touchdown.